When I started turning my small garage into a home boxing gym, I was surprised to learn that there were no guides I could easily follow, and so I had to do more own research than I initially expected. While there was some fun in that, here is an attempt to save time to someone going on the same Google journey.
Heavy bag
It all starts with a heavy punching bag, which is usually more difficult to squeeze in than other home gym equipment such as pull up bars or light double end bags. If you want it to be, well, heavy and yet not to take too much space, you'll need to make some unorthodox decisions.
Step 1: bracket
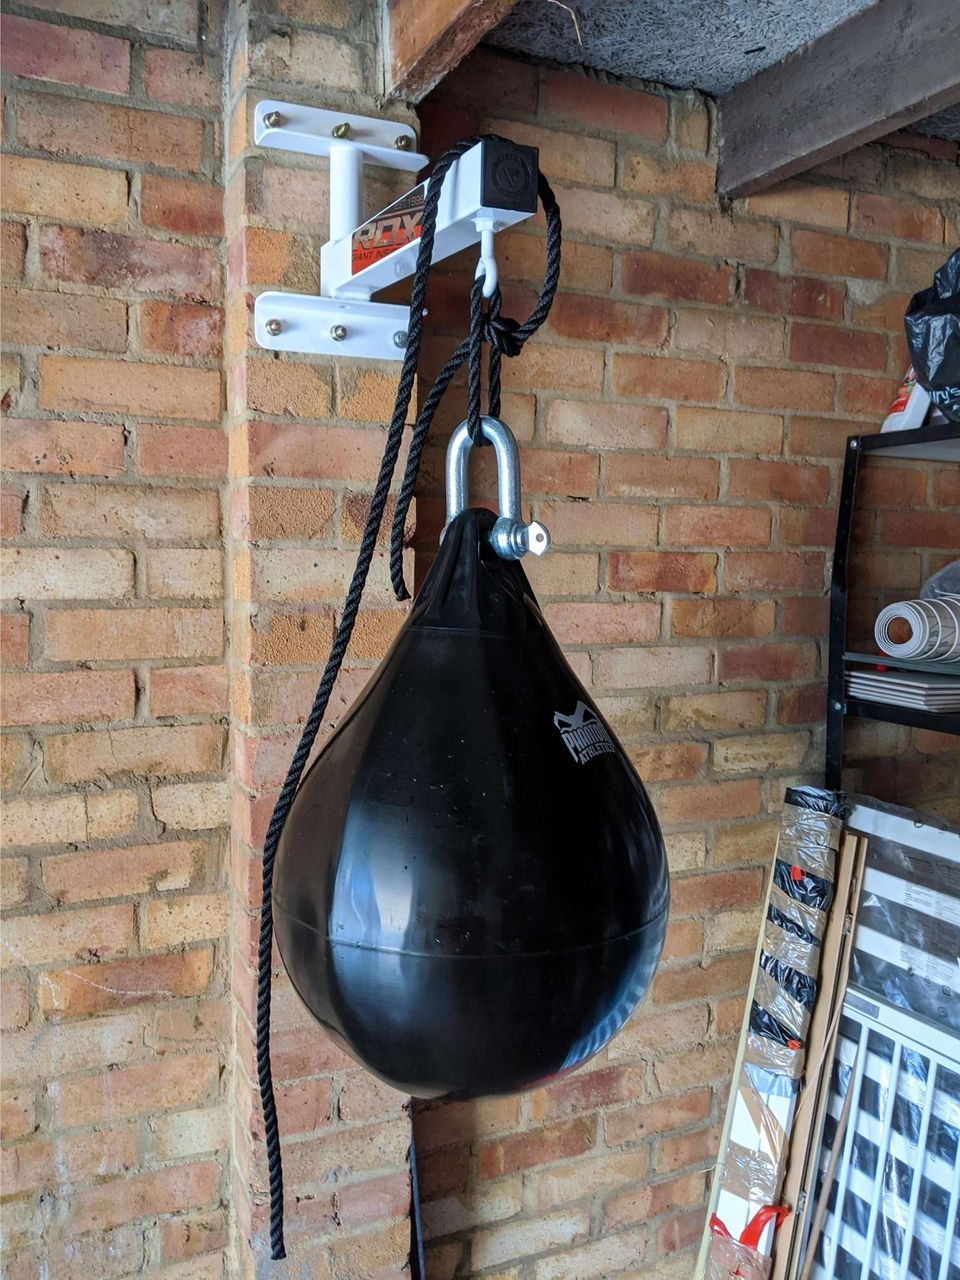
If you are lucky to have enough space for a proper load bearing ceiling mount and the bag comfortably hanging in the middle of the room, absolutely go for it. It is the best setup. The next best thing, if you can spare a fair bit of space, is a common wall bracket. If, however, you want to save as much space as possible, your options narrow down to a limited range of folding brackets.
I eventually went with RDX X5 for the following reasons:
- Folding mechanism is dead simple and because of that appears reliable: you have to lift the protruding bar to the tubular section of the bracket pole, rotate it 90° and slide it back on the square part of it. Compare it with this, this or this and see.
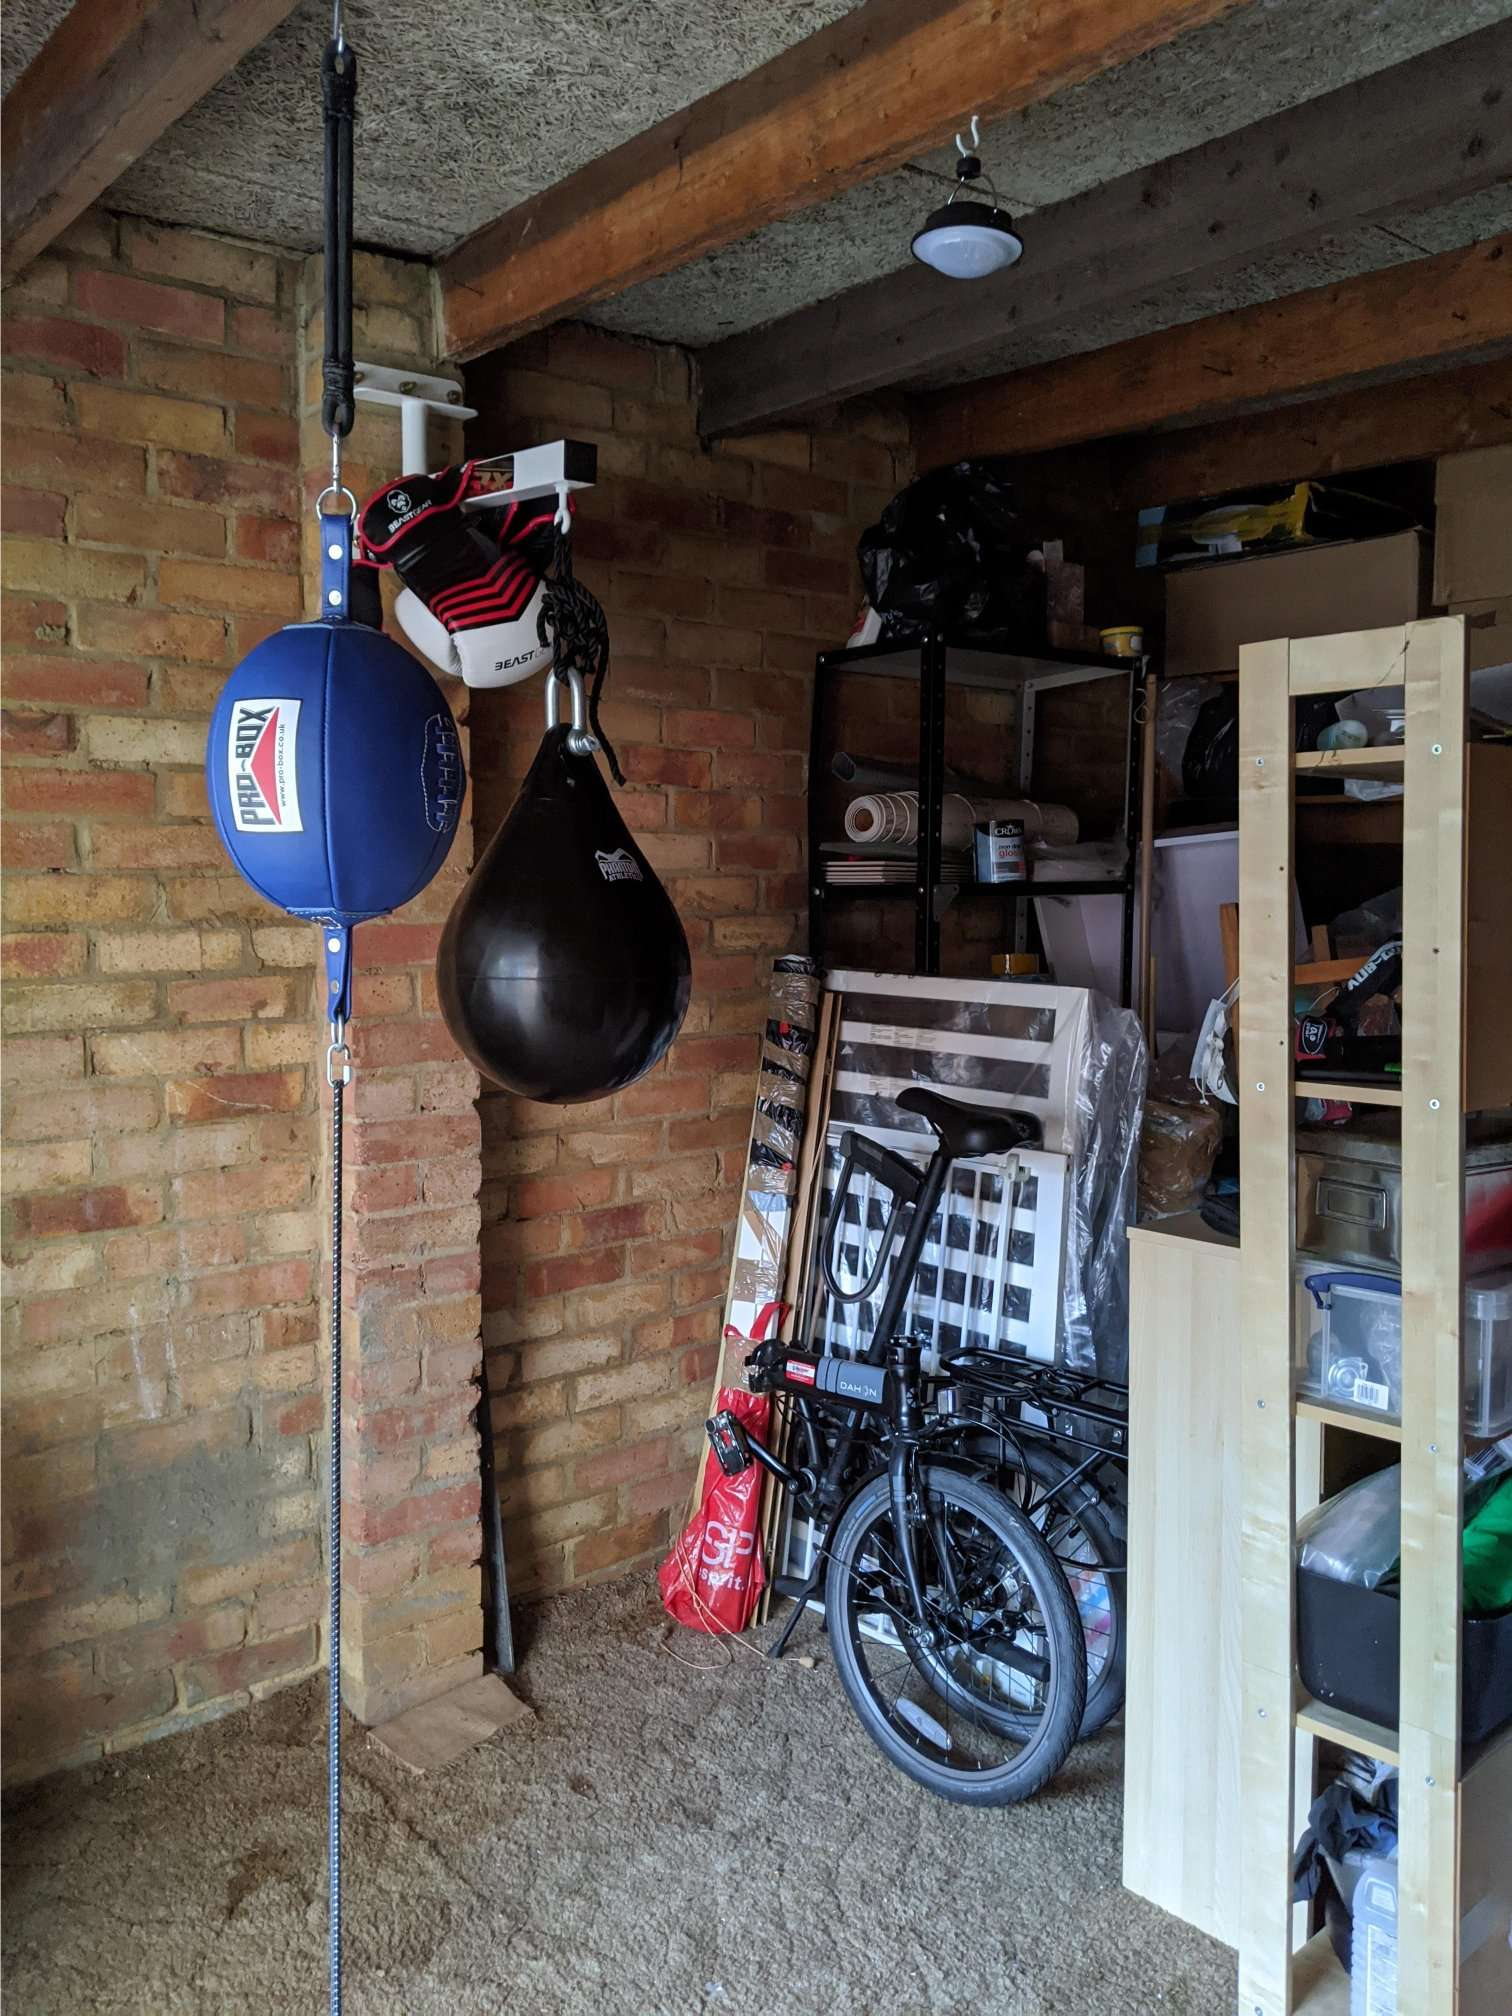
- Mounting area is compact enough, so I could put it on the narrow pillar part of the wall (see the picture). With that, I gained more swing space for the bag, plus it makes it easier to fold because the bag meets the wall a bit later this way.
- Since it folds sideways and not downwards like some other brackets, it is possible to fold it without taking the bag off - a big win. That, however, is physically much more difficult than it seems (albeit still possible) if the bag is heavy enough, plus it depends on the size of your bag - if it meets the wall too soon and your rope or chain is fairly short, you might not be able to fold it if the bracket is mounted on the flat wall.
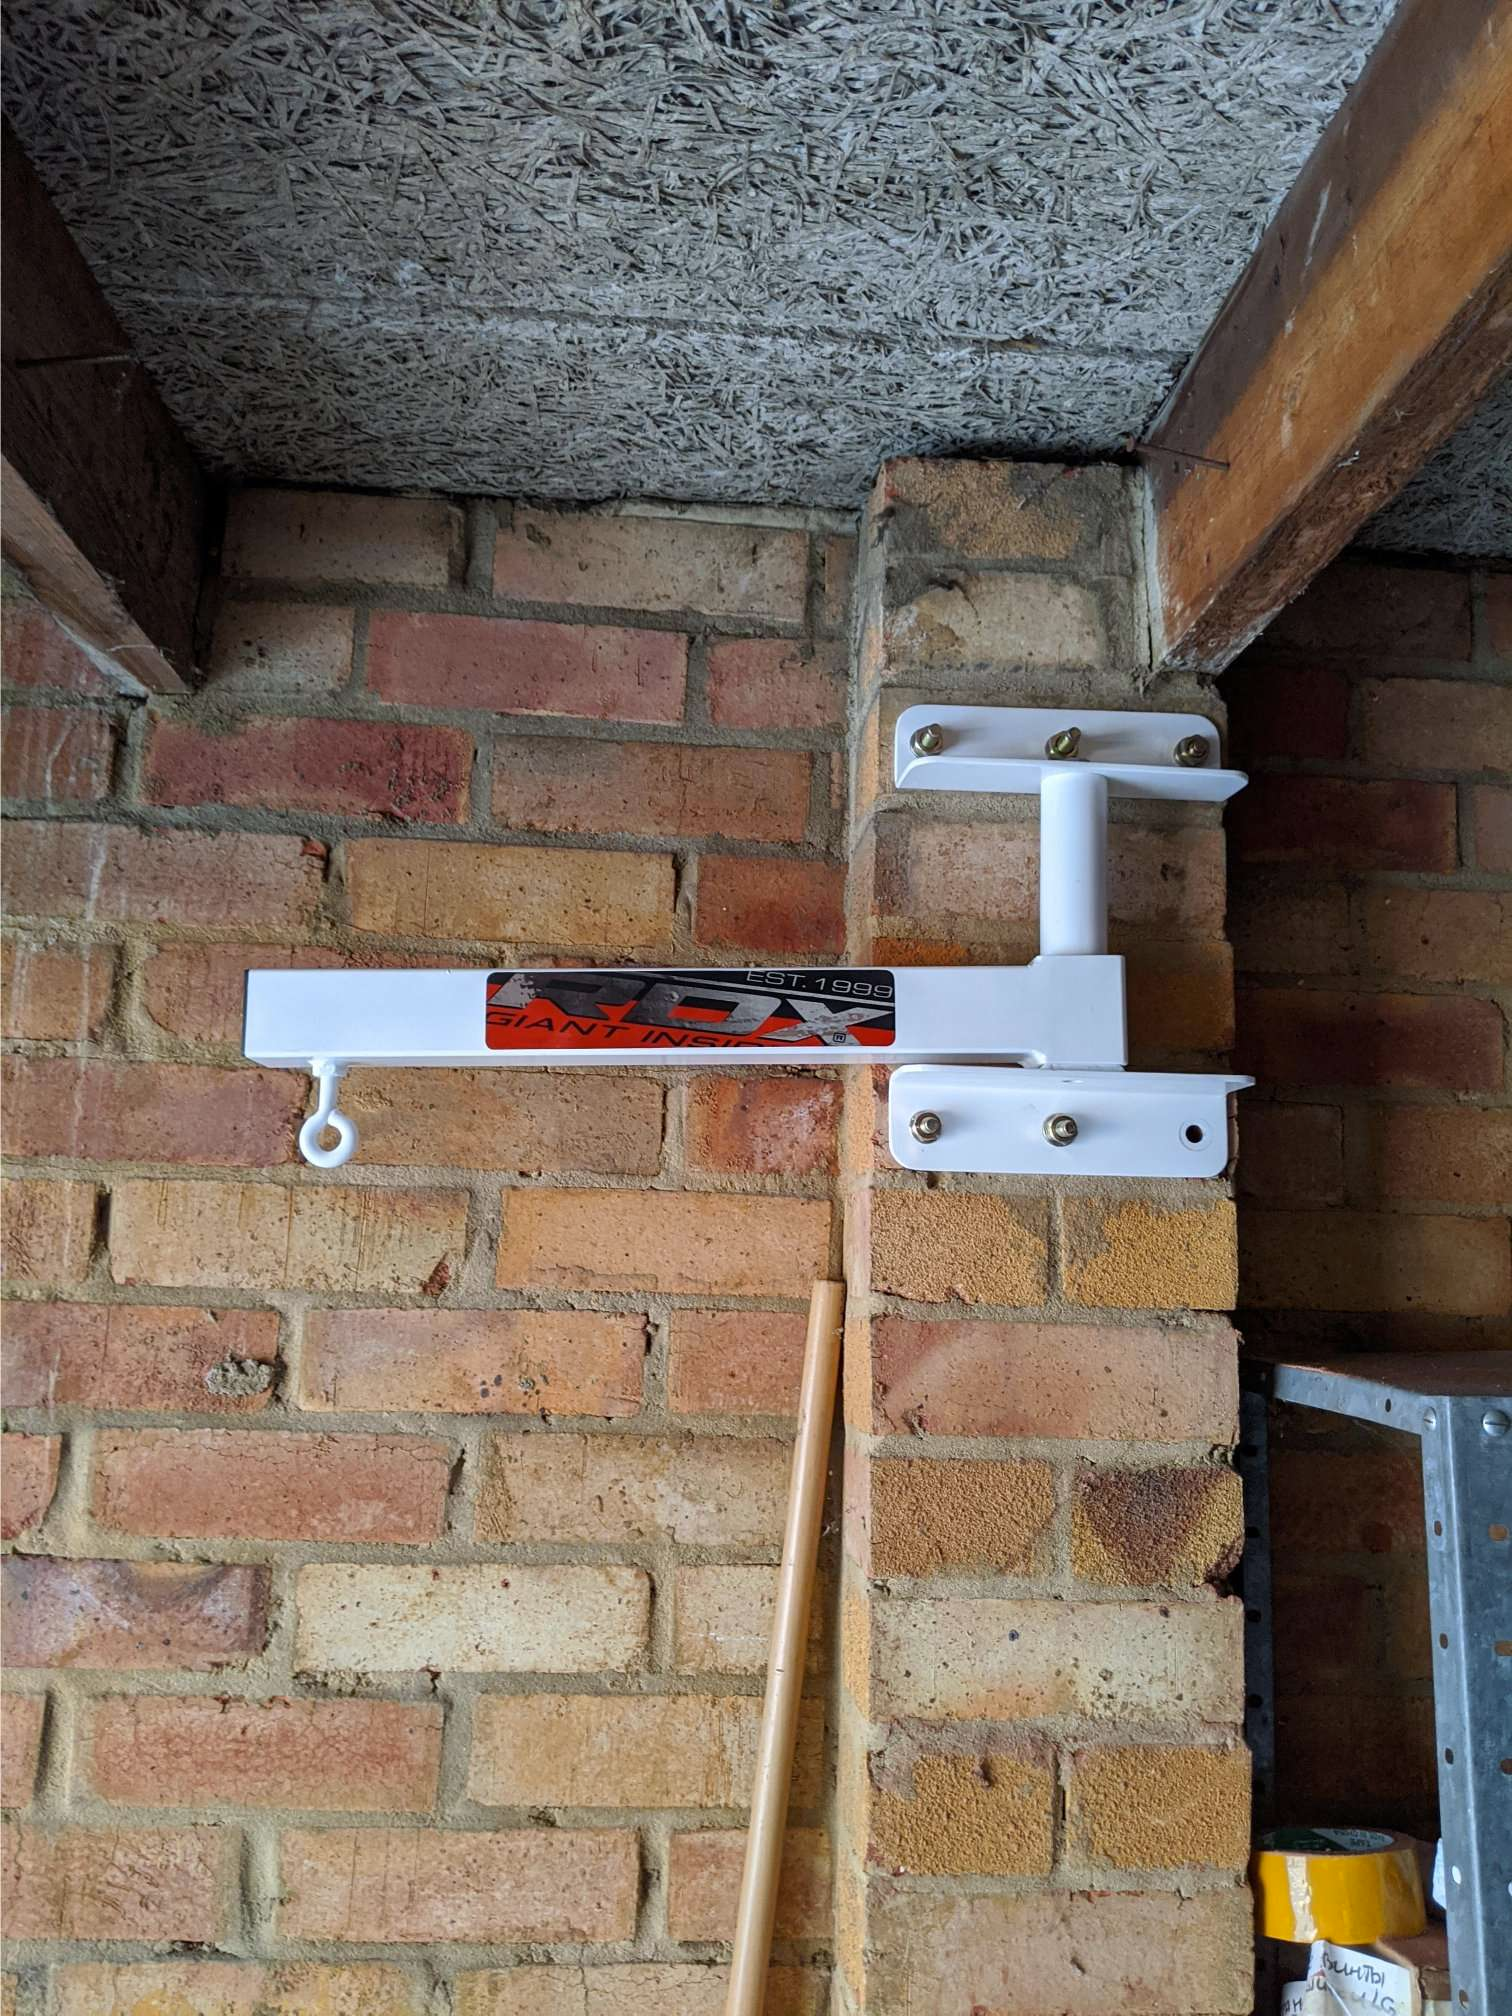
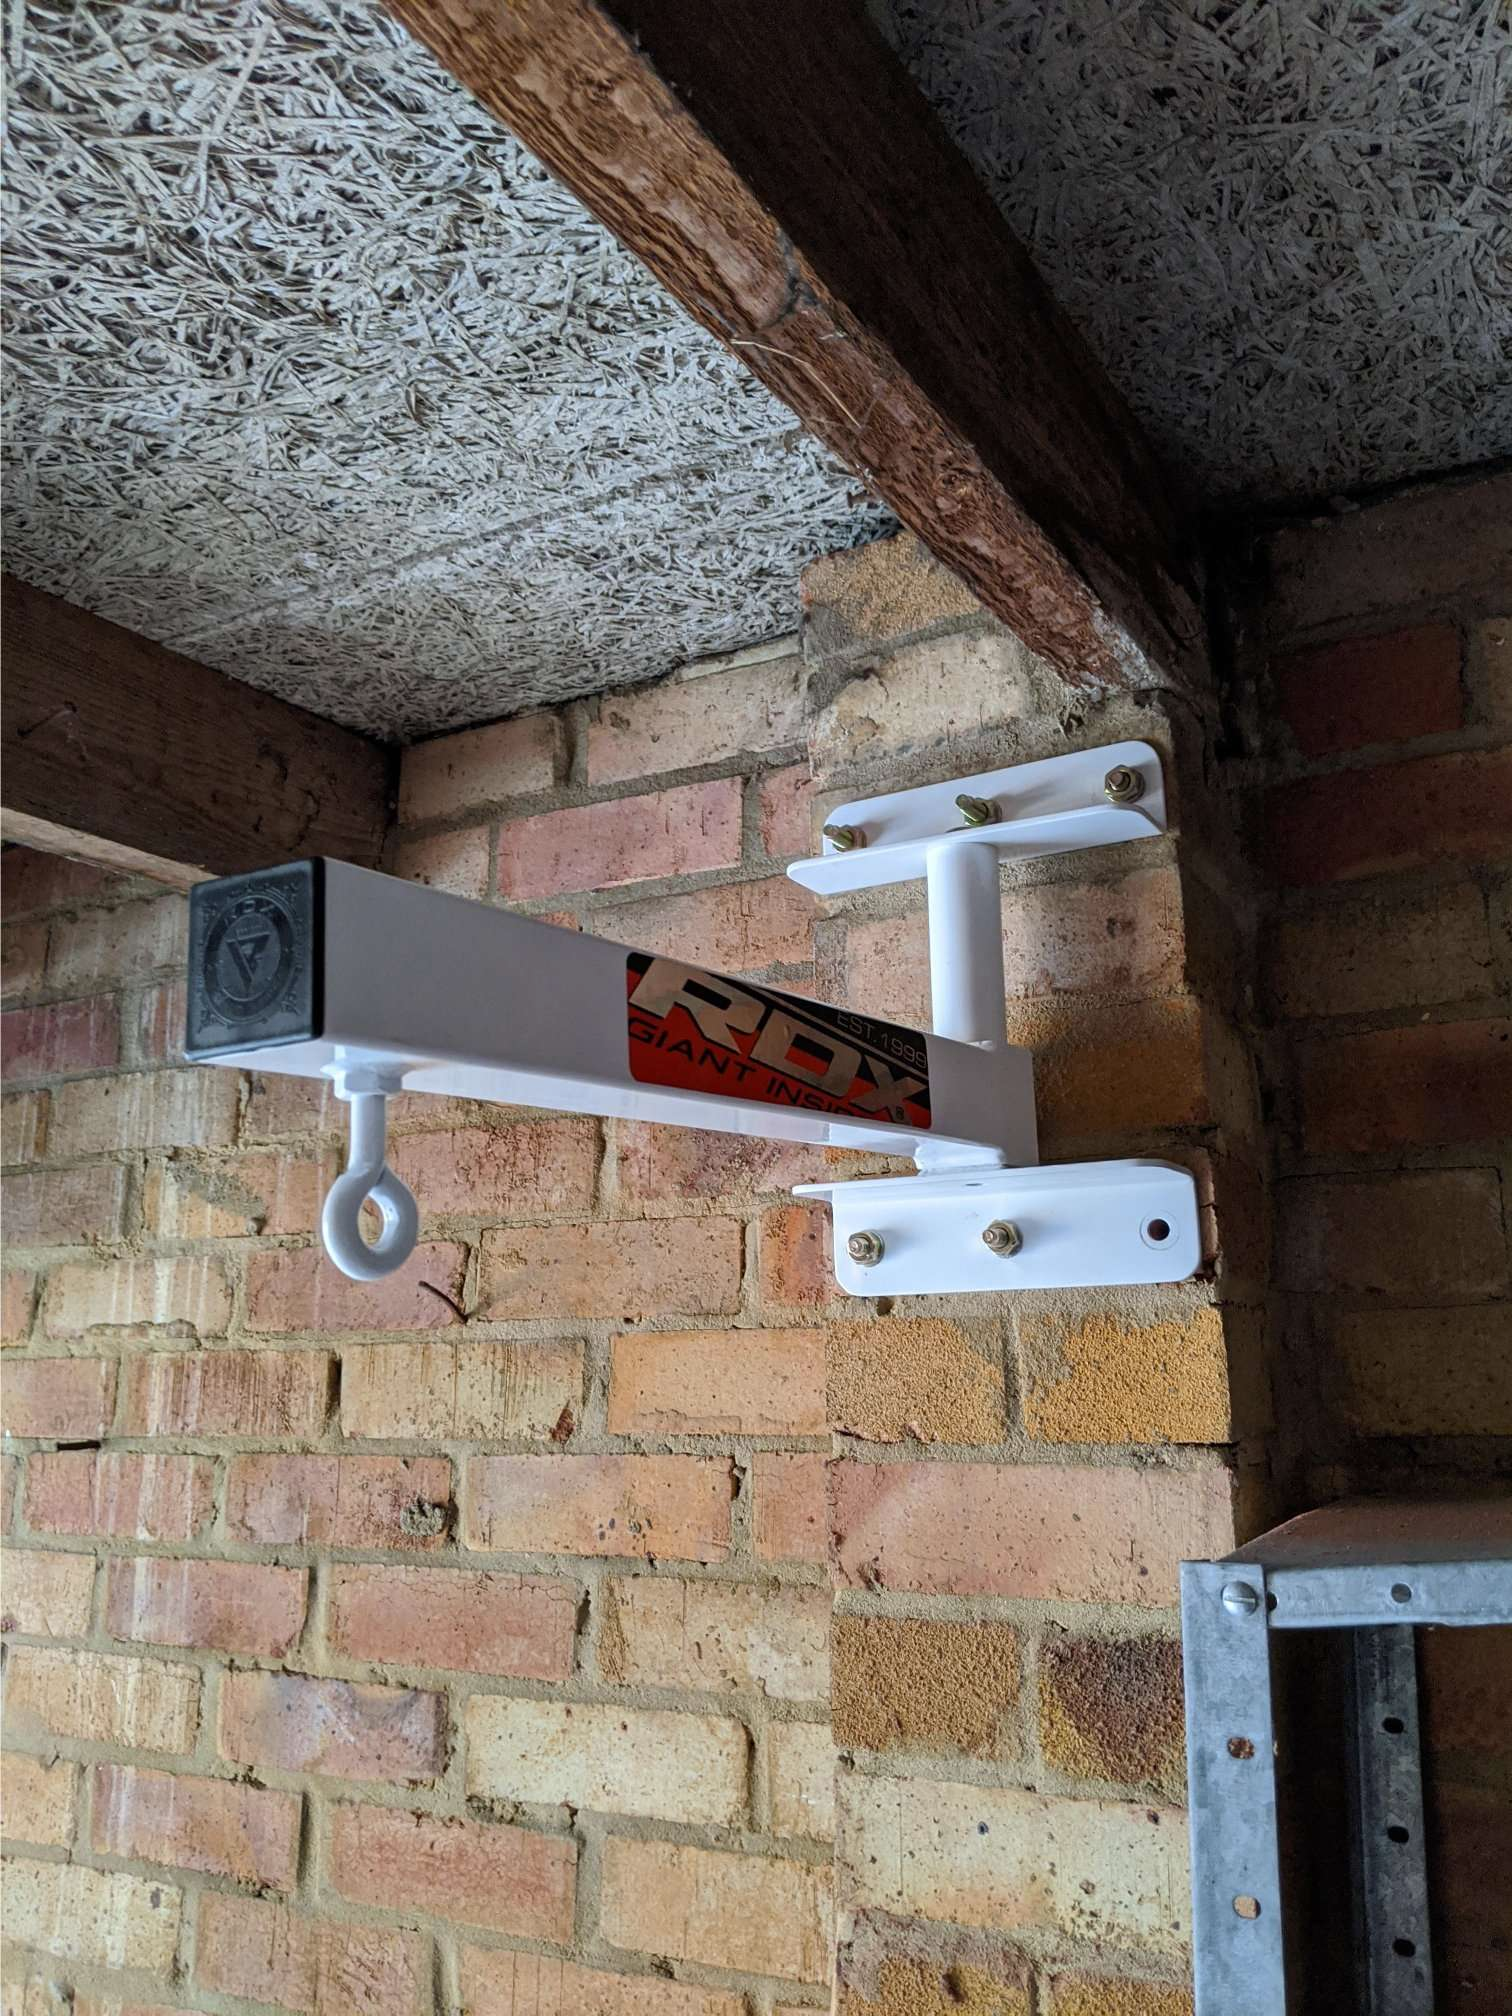
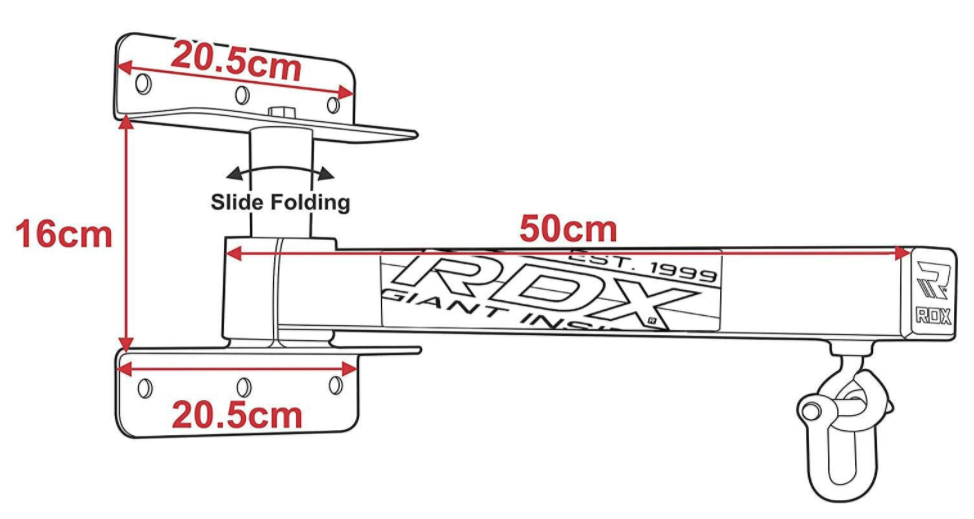
Be careful though if your ceiling is low - as you can see on the picture above, unlike with other brackets this one demands more vertical space which I wish I realised a bit earlier. I now have just enough vertical space and wish I had even a little bit more of it.
The bracket comes with screws and plugs, but you really want to use proper anchor bolts instead. I hired a handyman at MyBuilder.com to drill the wall because it turned out that to rent a powerful cordless drill (my garage is not electrified) for a day costs the same, but in your area it might be the other way around.
Lastly, I recommend buying it from RDX website directly and not from Amazon, at least in the UK. The price on Amazon is lower, but if you factor in shipping (which is not free as it's a heavy bulky item), it's the same - and if you unhappy with the purchase, shipping cost isn't refunded anyway.
Step 2: bag
Now the bracket it is place, the next thing you need is a punching bag, and this is where it gets interesting. You want a bag that is heavy enough (roughly half of your weight) and yet is also compact - and luckily there is an unorthodox solution to both of these problems, a rubber (or rather PVC/PU) bag filled with water.
Chances are you have never seen a bag like this before as they are pretty rare. I've been a customer of 6 different boxing gyms in London, and never saw one.
Why choose a water-filled bag?
- Water packs more weight in the same volume than what traditional pre-filled bags offer. They are mostly filled with textile or rubber mulch, so an average 4ft (120 cm) bag is only 18-20kg and 5ft raises it to 22kg.
The heaviest standard non-professional bag (i.e. the one that won't cost you a few hundred pounds) I could find is Decathlon Outshock 1200, but it remains out of stock even after the end of the lockdown.
Now even a reasonably compact 15" (38cm) water-filled bag is easily around 35kg. - Portability. Should you want to replace your water-filled bag, you can empty it and store it conveniently. You can also sell it and post it without paying prohibitive fees because of its dimensions and weight.
- Pear-shape bags are good for practicing not only straight punches and hooks, but also angle ones and uppercuts. At the same time the smallest traditional angle bags are going to be larger - that isn't bad, but is going it eat up almost all the space your compact bracket offers between its eyelet and the wall (it's usually no more than 2ft or about 55cm) leaving almost space no for that wide swing.
- More tolerant to low mounted brackets. The ceiling in my garage isn't high in the first place, plus a good bit of available height was eaten by a ceiling beam and the bracket that due to its design sits low. With a traditional bag, you'll have to craft a top board like in this video, while pear-shaped bags actually are best positioned at your head level or even a bit lower (like here).
Why you still might not want it?
- Shape. If you want to practice kicks, you'll need a traditional long bag, full stop. It is not impossible to kick a pear-shaped bag, but let's be honest, you are not this guy.
- It is harder than a traditional bag. Bare knuckles practice, if this is your thing, is going to be problematic, if possible at all. You'll even want to wear your sparring gloves and not just bag mitts for this one. This is also a good thing though - for example, I tried hitting it without gloves and immediately realised my hook wasn't ending with the wrist positioned correctly. Other bags would be more forgiving.
- If your are hanging it outside or somewhere with no heating, in winter it's going to be even harder on your hands. You can add some anti-freeze to water, but it's the PU material that would become less flexible in low temperatures. I am yet to learn what it's like in winter, and it entirely possible that it isn't a problem at all, but some reviews suggest this, so I'm putting it here just in case.
Which bag?
The most famous brand that you also see in videos with famous boxers hitting water-filled bags is Aqua Bag. It is also predictably the most expensive option, but if you're comfortable with the price, you can't be wrong with this choice.
There are, however, cheaper brands - such as Phantom Althetic. With the ongoing discount and free delivery from Germany (expect it to take about a week though) it is about two times cheaper than an Aqua Bag of the same size.
You can, however, pay even less. It turns out that common Polyform boat fenders are just as good. They even look surprisingly similar, down to small details - and there are many more colour options.
I decided to stay on the safe side and got the Phantom Athletic 38cm bag, but guess what, it has the same boat fender recommended air pressure marking on it:
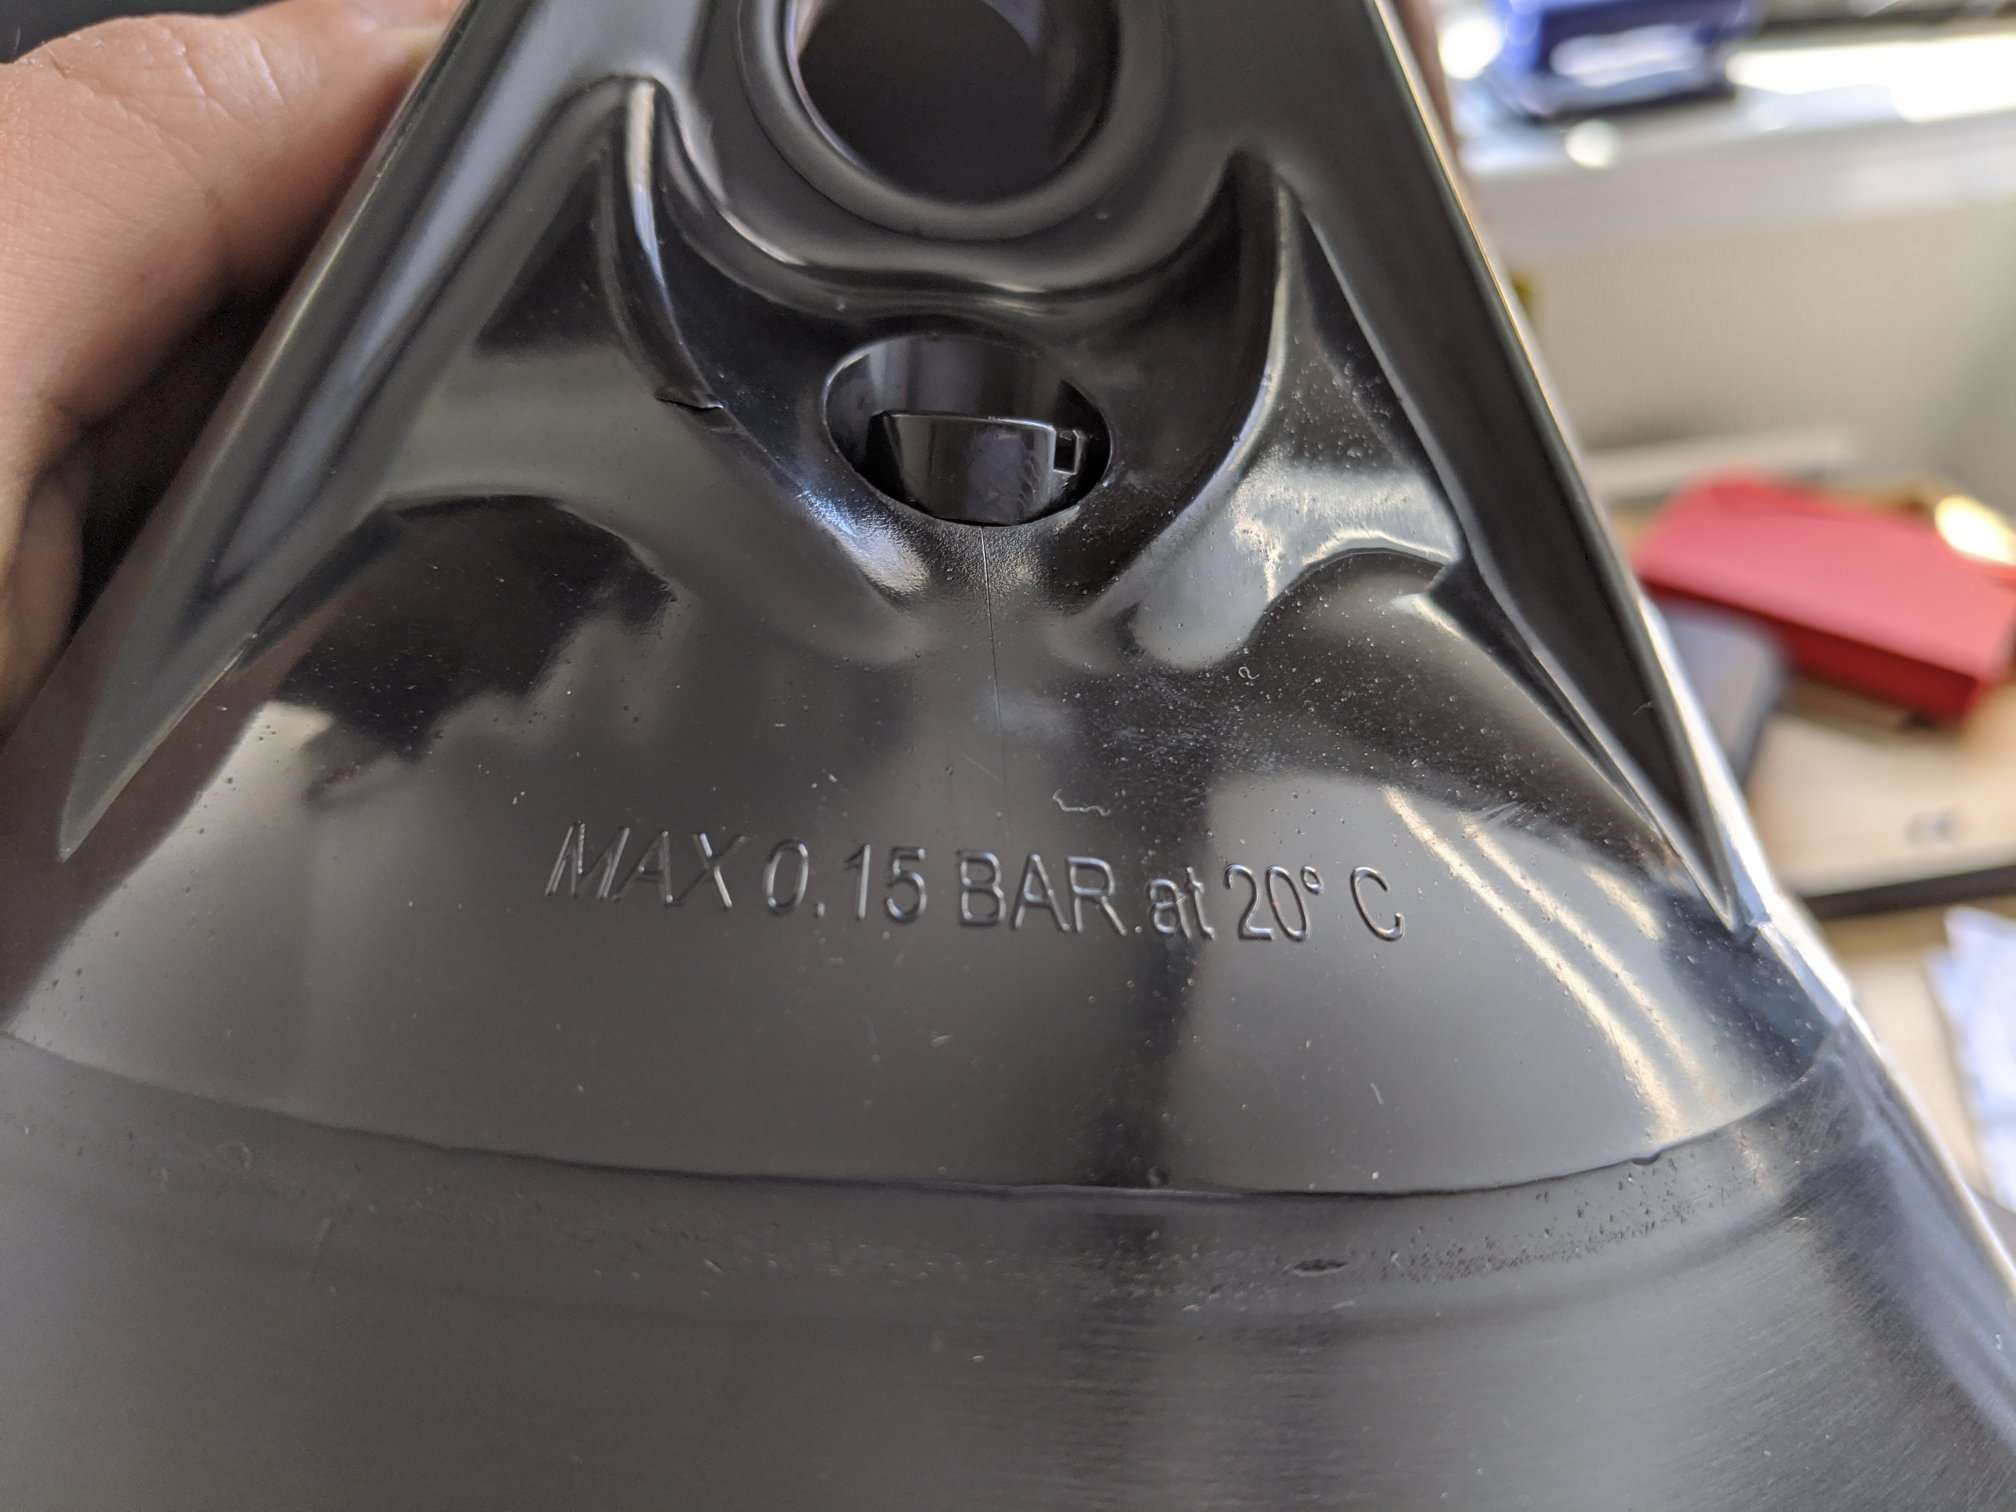
It isn't 'just like a common boat fender', it probably IS a 'common boat fender' with a new logo printed on the side. While I am reasonably happy with my purchase, knowing that, I see no reason no to go for a cheaper and more brightly coloured option, unless you're ready to splash enough for an Aqua Bag.
While most of the bags like this come in the same pear shape, I also came across a longer Everlast Hydrostrike. It doesn't look bad as well, but I couldn't find it anywhere with a delivery to the UK. But if you like this shape more, I guess you can buy a similarly shaped boat fender which are also widely available for a fraction of the price.
After using this my new bag for while I remain pretty happy with it. It is comfortably heavy, so it is swinging, but not too much. Its size is right for me - could be a bit larger, but certainly not too small. Filling it was easy - it comes with a garden hose adaptor. My only complaint is that the plug could be tighter - I had to put a layer of bandage tape around it to prevent it from coming off occasionally after heavy punches (but it could be that I have just overfilled the bag). Aqua Bag system looks a bit more reliable.
Phantom Athletics bag also comes with a synthetic rope that you can you to hang it, and I also recommend it over a chain for home gym use since it's quieter and doesn't wear out the bracket eyelet (which is not replaceable, unlike the rope). Obviously you'd first want to hang it and only then fill the bag with water because doing it the other way around will be awkward and you'll need other person's help.
If you go with a rope, be sure to use a knot that doesn't slide under load. A rock climber friend recommended bowline knot which worked well for me and is not difficult to tie. Voila:

Double end bag
Now that you have a heavy bag, the next step is to get a double end light bag. The heavy bag is great for developing power shots, but it doesn't teach you accuracy or improve your reflexes, and you have to constantly remind yourself to move around it, while a double end bag is always ready to come back in your face. These pieces of equipment compliment each other perfectly, and this is why you need both.
There are many double end bags to choose from with the prices varying from £10 to £100 (when looking online, also search for 'floor to ceiling bags' as some listings won't come up for 'double end' keywords). Professional models can be even more expensive, but realistically what you have to avoid is the listings that have pictures with people badly photoshopped on them. it's also a good sign when the bag has metal rings on both ends instead of faux leather loops. If the bag doesn't come with all the fixtures or even cords, it also isn't a problem (and arguably is a sign of getting a better bag for the same money) as all of that readily available in your nearest hardware store.
You also don't want a bag larger than 20cm in diameter even if you're a beginner. In short, it has to be size of human's head or smaller (up to as small as a tennis ball, although this is for more experienced boxers).
I went with this mid-range Pro Box bag. It comes with belts that end with a stretchy rubber section, which were too long for my low ceiling, although they both have an adjustment buckle on them (and so you can cut them to make them shorter).
As I was sticking to the compact setup, I got the quick release carabiners so I can dismantle your bag and put it bag quickly. Plus, I don't play football, so I didn't have a pump needle to inflate the bag's bladder, and I had to buy it separately.
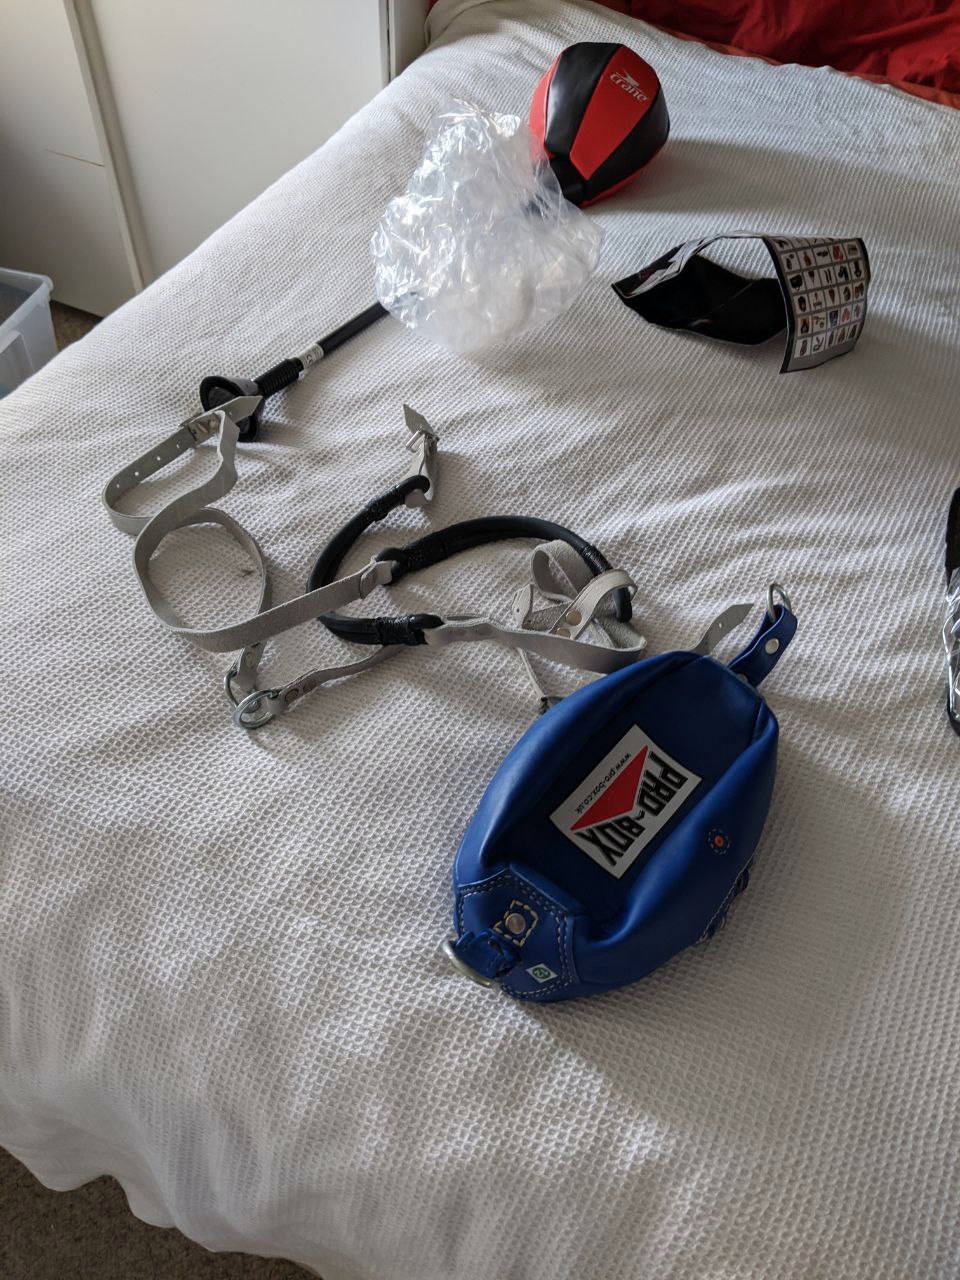
You can use another wall bracket if you can't drill into your ceiling, but as unlike with the heavy bag it doesn't have to support a lot of weight, chances are you can use a ceiling mount for it. If you still go for a bracket, again be mindful about the vertical space as you would still need enough of it for the bungee cord to work.
Floor mounting point is a bigger problem as you don't want to be stumbling over the bit of metal when the bag is not in use. One way to avoid it is simply to attach the cord to something heavy like a kettlebell if you already have it. Another is to buy something like this.
I simply drilled into the my garage's concrete floor and put a D-ring there that folds flat when not in use. I used the bungee cord section that came with the bag as the top cord, and the bottom one is a generic 1.5m cord looped through the bottom ring. It is less resistant than the top one, but because it's tensioned more, the bag still doesn't go up and down when hit (which is a sing that your tension is uneven and you need to adjust it).
Well, that's about it. Many things can still be improved, but the lesson here is that it's easier to organise yourself a space like this than I used to believe, and now I only wish I did it earlier.